Running OpenSAFELY in GitHub Codespaces
Introduction🔗
The OpenSAFELY research template contains a configuration to allow you to run OpenSAFELY without any installation required on your own computer.
This uses GitHub Codespaces. GitHub provide users with a free monthly quota of Codespaces use.
This page explains:
- what GitHub Codespaces is
- how to run some OpenSAFELY features in GitHub Codespaces
- how to get ready to run the ehrQL tutorial
- how GitHub's free user quota for Codespaces works
You only require a web browser to follow the instructions in this page.
What is GitHub Codespaces?🔗
Codespaces is a coding environment hosted online by GitHub. Codespaces can be accessed via your web browser without any additional installation.
A codespace provides:
- a "virtual machine" — a computer running as software inside another computer — that is hosted by GitHub
- a Visual Studio Code environment for editing your project and running commands
When you open a codespace in browser, you get access to the Visual Studio Code environment. Through that interface, you can run commands inside the codespace's virtual machine. This is just as if it were a real desktop or laptop that you were working on, except this virtual machines has been configured for OpenSAFELY use.
This removes the need to have anything other than a web browser installed to work on OpenSAFELY projects.
Create a GitHub account🔗
Before starting with OpenSAFELY in GitHub Codespaces, you will need a free GitHub account.
If you do not already have a GitHub account, go to the GitHub pricing page, and choose to sign up with a free account. The screenshot below shows this.

Follow the rest of the sign up process on GitHub's site.
Sign in to GitHub🔗
Whether you have created a new GitHub account, or are using an existing GitHub account, make sure you are signed in to your GitHub account.
The options to create a code repository and codespace only appear when logged in.
Using GitHub Codespaces for OpenSAFELY projects🔗
To start a Codespace, you first need to create a code repository. From that repository, you can create a codespace.
Info
A "code repository" is where code gets published on GitHub. This is not to be confused with a codespace.
A codespace refers specifically to a virtual machine environment, that contains a copy of your repository code to work on.
We will use the OpenSAFELY research code template as a starting basis for our code.
Create a code repository for your work🔗
You only need to create a code repository once for a particular project.
Create a new research code repository based on the research template.
- In your web browser, go to the research code template repository.
- Click the "Use this template" button to begin the process of creating a new research code repository for you to work on. The screenshot below shows this.

There are several options given when creating a new repository from a template.
Here is a quick summary of what you should choose:
- You should choose your own GitHub user account as the repository owner.
- You can enter any name and description that you choose for your repository.
For this example,
we will use
opensafely-exampleas the name. - For this example, it does not matter whether the repository visibility is public or private.
- You do not need to select "Include all branches".
- You can ignore the mention of "GitHub Apps from GitHub Marketplace" in GitHub's instructions for creating a new repository from a template.
If you are unsure of what to do, refer to GitHub's step-by-step instructions for creating a new repository from a template.
Warning
Creating a repository with your GitHub user account will enable you to:
- work on your OpenSAFELY research code in Codespaces
- check that your research code works with the OpenSAFELY platform
It will not allow you to run code on OpenSAFELY's platform.
For that, you would have to request that your repository is transferred to the opensafely organization.
Approved OpenSAFELY users are able to create a repository within the opensafely organization directly.
Create a codespace🔗
Once you have a research code repository created, you can create a codespace from that repository:
- In a web browser, go to your newly created research code repository on GitHub.
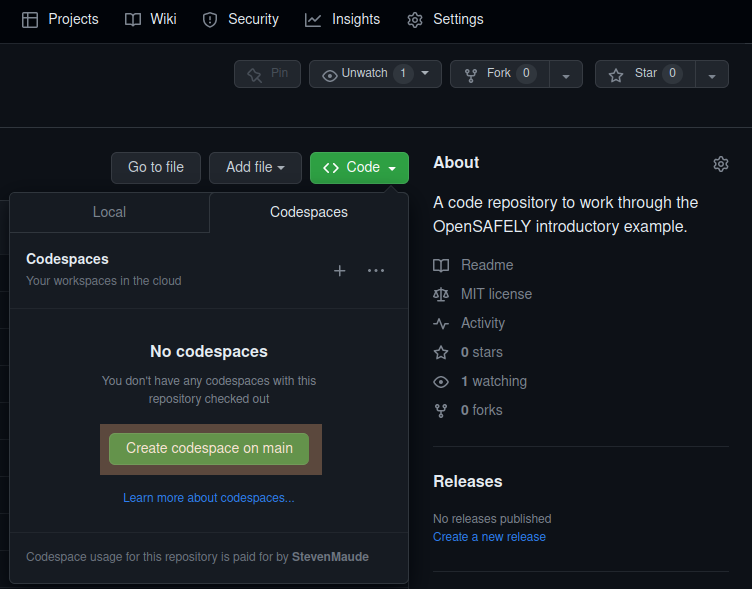
- Click the "Code" button
- Select "Create codespace on main". The screenshot below shows this.
When you create a codespace, GitHub has to set up the codespace. The screenshot below shows this.
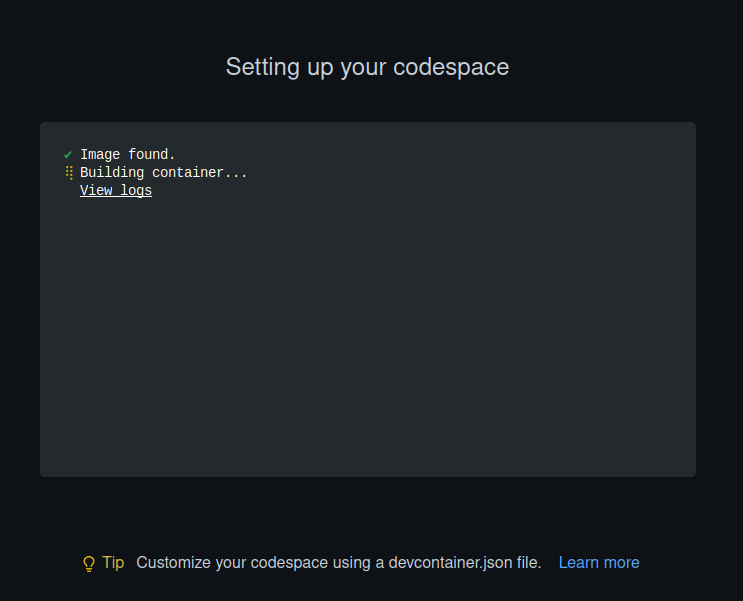
It may take a few minutes before the codespace is ready for use.
Info
"main" is the current Git branch and what we will use for just trying everything out here.
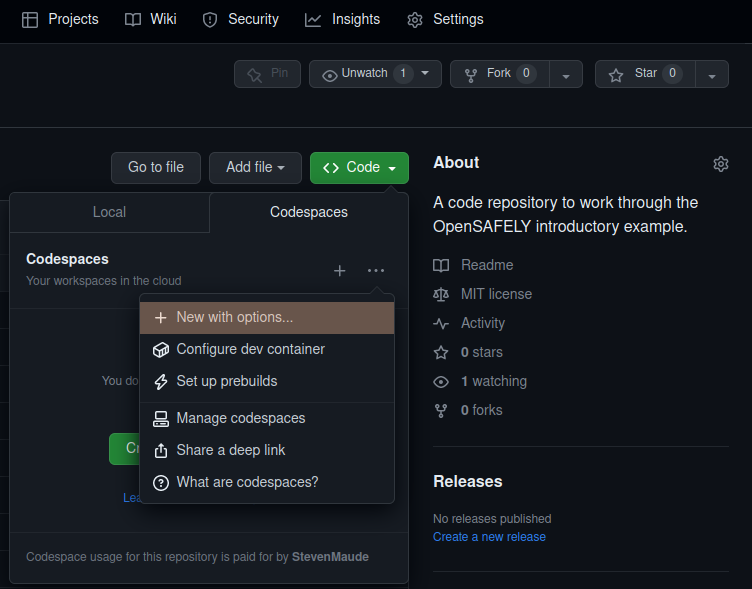
If you are working on another repository branch, it is possible to select "New from options", which allows you to choose the branch. The screenshot below shows this.
Navigating the codespace🔗
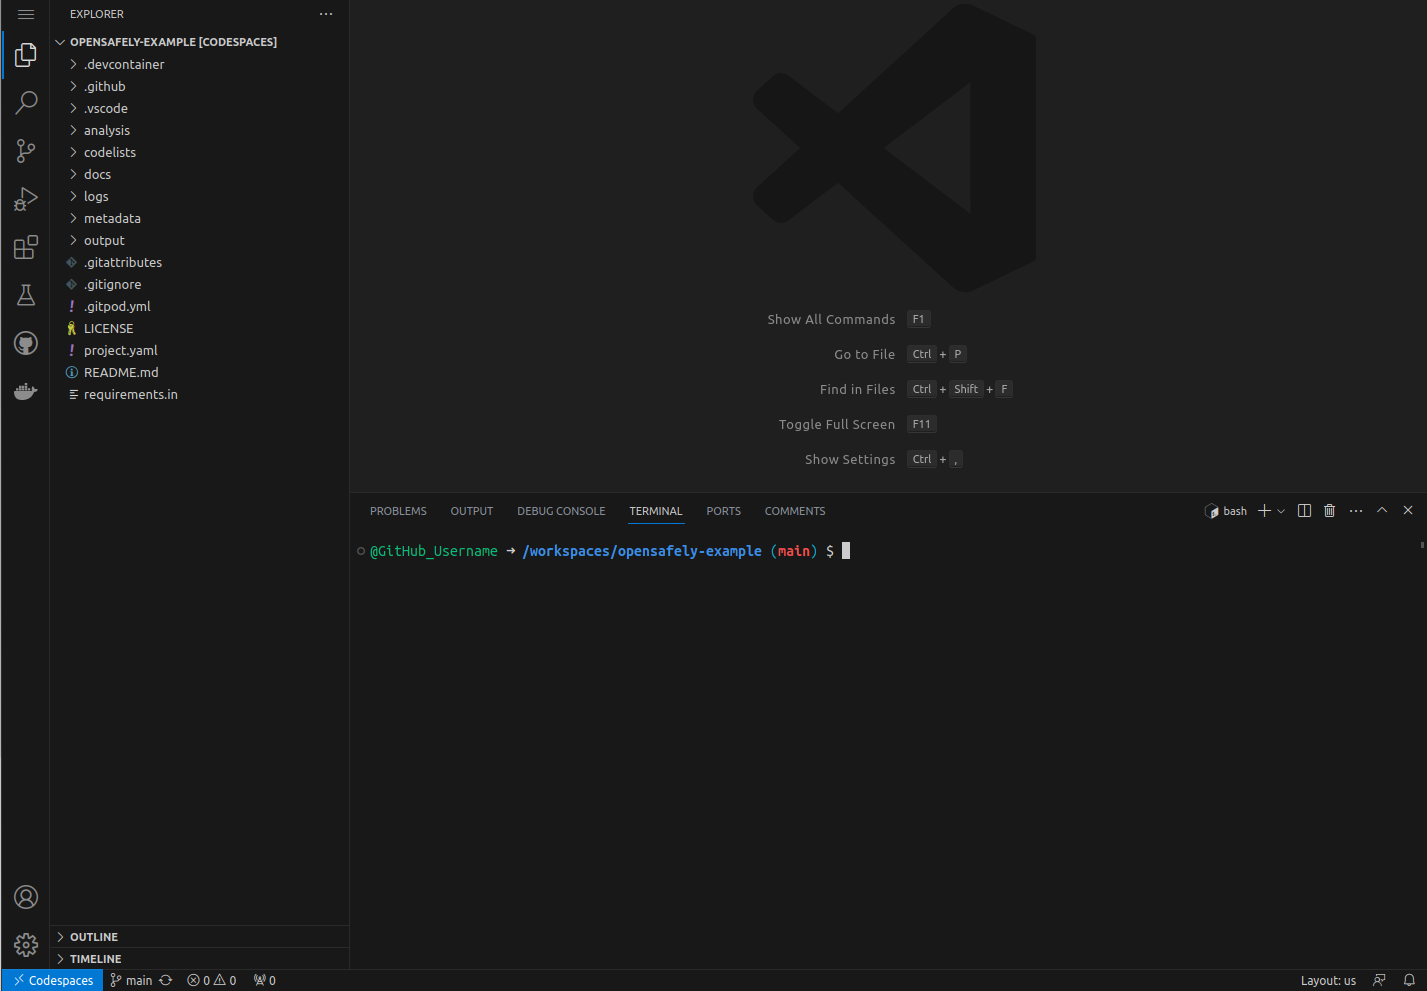
When the build process for the codespace completes, you should see a Visual Studio Code editor with three panes.
Briefly, when you first open Visual Studio Code, you will see:
- at the far left, a vertical bar of icons showing various options
- on the left, the project's files and folders in the file explorer
- a terminal at the bottom-right
- a file editor at the upper-right; this initially remains blank until you open a file
The screenshot below shows this.
Info
There are other elements to the user interface. If you are unfamiliar with Visual Studio Code, you can:
- refer to the explanation in GitHub's documentation for more details.
- refer to the Visual Studio Code user interface documentation
It is possible to resize the different panes as needed by hovering on the dividers between sections of the screen.
Working with files🔗
Editing code🔗
The file explorer shows the contents of your code repository.
You can open files and folders by clicking on them.
Saving files in the codespace🔗
The codespace is currently configured to autosave files when modified.
Reverting changes to files in the codespace🔗
You can do this via the Source Control panel in the Visual Studio Code interface.
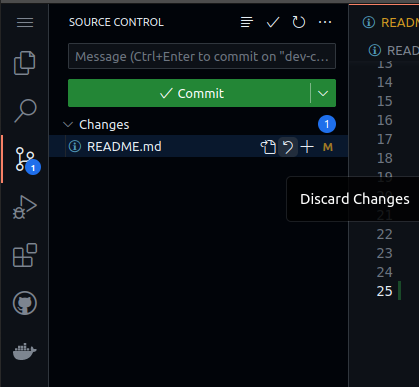
- Select the Source Control panel on the left-hand side.
- You should see a list of the changes.
- You choose to "Discard Changes" for each file. This reverts the files back to how they are in the current version of the repository. The screenshot below shows this.
Info
For users comfortable with command-line Git,
you can use git in the terminal to work with the repository,
including reverting changes.
This page will not cover use of command-line Git.
Updating files in the repository🔗
You can use the Source Control panel to update files in the repository.
A codespace is self-contained with its own copy of your repository's files. This is just as if you were working on a local copy of the repository on your own computer.
Changes to the copy of your repository in the codespace do not automatically change the state of your published repository on GitHub.
To get changes from a codespace to the GitHub repository, you must use the Source Control view to add, commit and publish those changes to your GitHub repository. If you are unfamiliar with Visual Studio Code and GitHub, GitHub has a guide on using this.
When you update files by publishing to the repository's main branch,
this should trigger an automated check of whether your code will run in OpenSAFELY.
These checks can be viewed from the Actions tab,
accessed via your repository on GitHub's site.
The screenshot below shows what this tab looks like..

Info
If you are comfortable with Git, you can also create and switch between different branches in the codespace in the Visual Studio Code interface or by the terminal using command-line Git.
A quick overview of what is included in the codespace🔗
Now that we have a GitHub codespace running, we can use OpenSAFELY.
Here is a short, non-exhaustive guide to what OpenSAFELY provides in the codespace.
Run the OpenSAFELY command-line interface (CLI)🔗
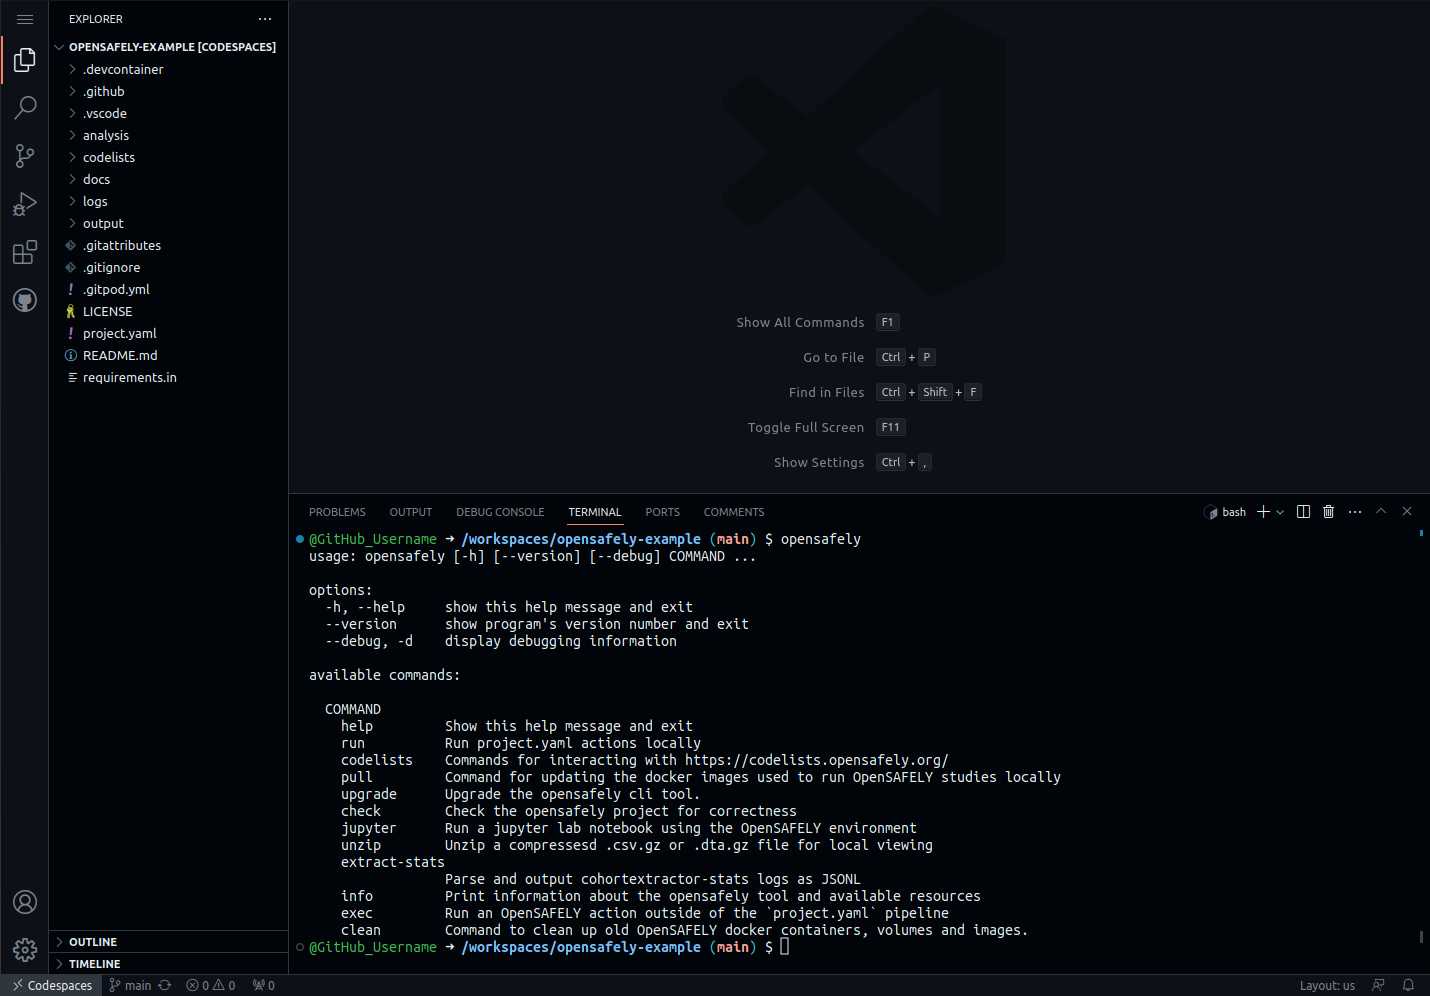
- You can run the OpenSAFELY CLI in GitHub Codespaces.
In the Visual Studio Code terminal, type
opensafelyand press Enter. - You should see the OpenSAFELY CLI help prompt. The screenshot below shows this.
Info
See the OpenSAFELY CLI documentation for more details.
Run the example project🔗
The research code repository that you created already has an OpenSAFELY project in it. We can try this out to show that everything works as if we had installed the OpenSAFELY CLI.
Ensure you are in the correct directory to run the project🔗
- By default, the terminal that has opened should be in the correct directory (folder)
that contains the
project.yamlfile. - This directory is
/workspaces/opensafely-example - You can check the current working directory by referring to the terminal prompt.
- If necessary, you can change directory to the correct directory by typing:
cd /workspaces/opensafely-exampleand pressing Enter.
Use OpenSAFELY CLI to run the example project🔗
- In the Visual Studio Code terminal,
type
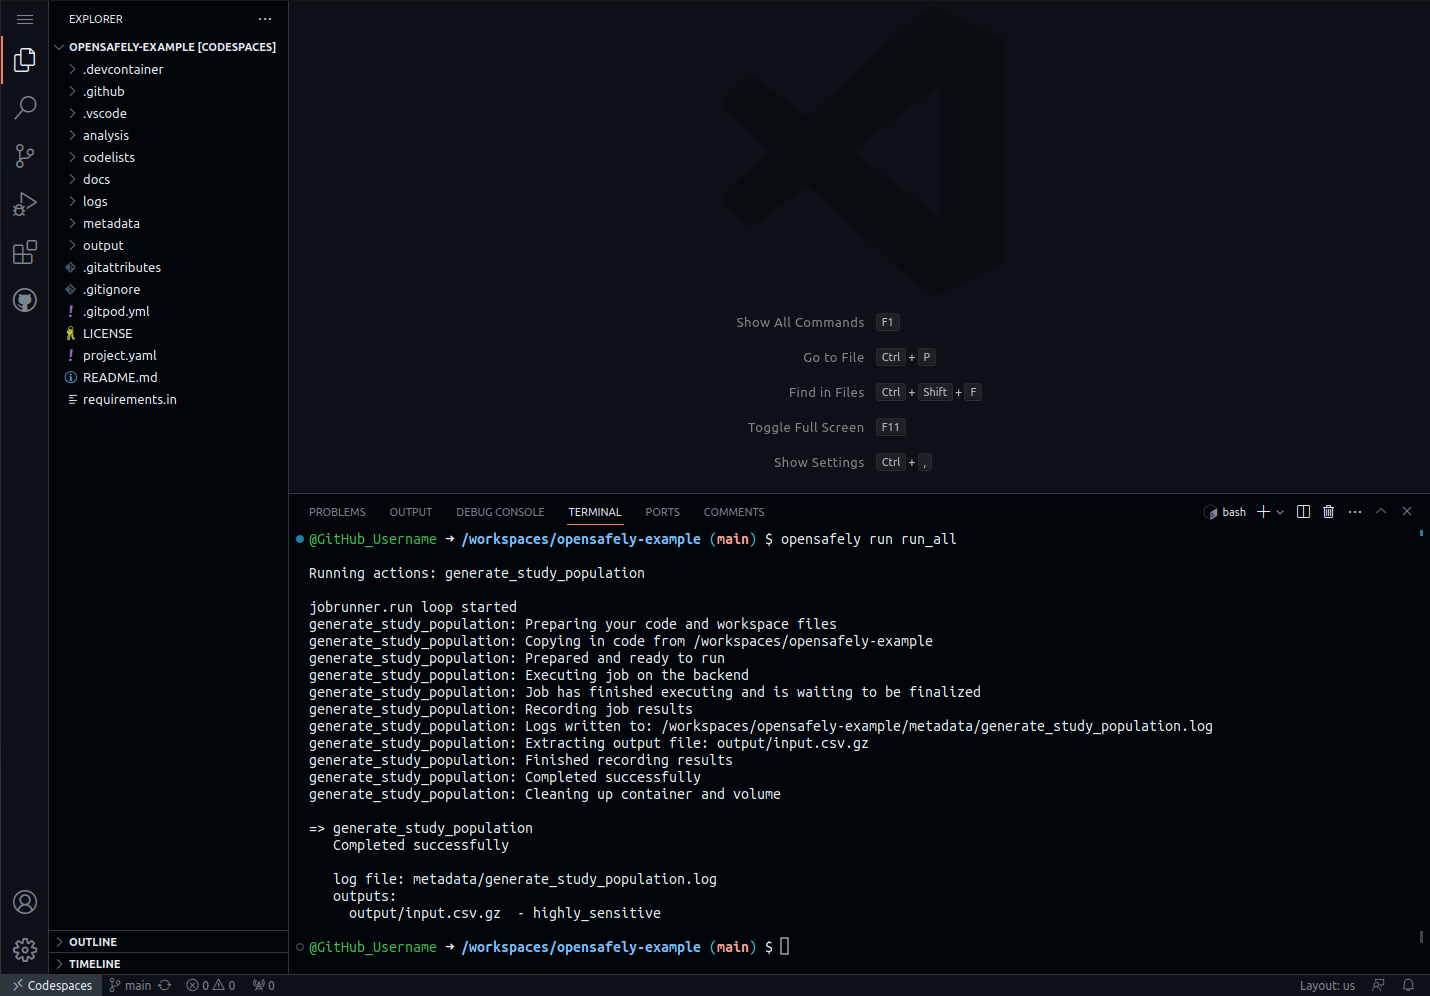
opensafely run run_alland then press Enter to run the existingproject.yaml. - This may take a few moments to download the required Docker images, before the project is run.
You should see some information messages that should end something like:
=> generate_study_population
Completed successfully
The screenshot below shows this.
Info
The research code example project is currently based on a legacy cohort-extractor project using a study definition.
In future, we will amend this example to be based on ehrQL.
ehrQL is the replacement for cohort-extractor and should be used to write dataset definitions for new OpenSAFELY research.
cohort-extractor and ehrQL are used to extract details of populations of interest from OpenSAFELY backends.
Follow the ehrQL tutorial🔗
The ehrQL tutorial assumes that you are working on your own computer, where you would be familiar creating files and folders.
It requires you to create a learning-ehrql directory,
you can do this either in the Visual Studio Code interfacem
or via the terminal.
To create a new folder using the Visual Studio Code interface🔗
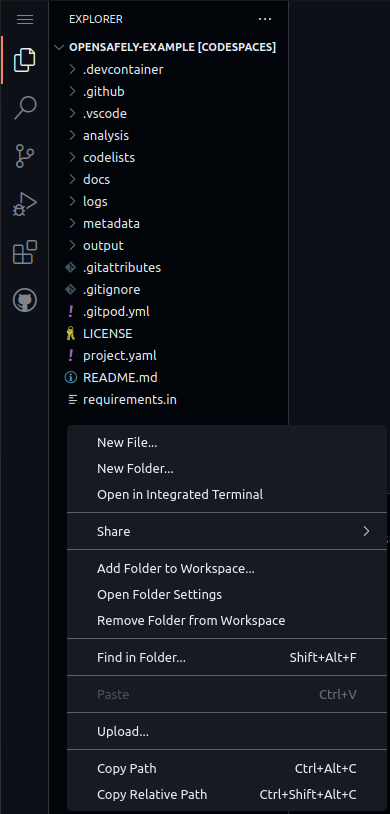
- Move the mouse pointer to the file explorer outside of a directory and right-click..
- From the menu, select "New Folder…".
The screenshot below shows this.
- Name the folder
learning-ehrql. - Right-click and select "Open in Integrated Terminal".
The screenshot below shows this.
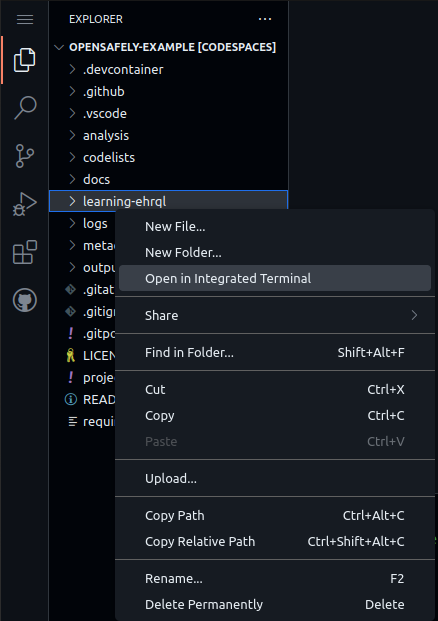
- A new terminal will open up in the correct directory. You can see the list of open terminals in the bottom-right.
To create a new folder using the terminal:🔗
- Ensure that the terminal is in the
/workspaces/opensafely-exampledirectory by checking the command prompt and typingmkdir learning-ehrqland pressing Enter. - Change to the
learning-ehrqldirectory by typingcd learning-ehrqland pressing Enter.
In either case, the terminal prompt should be /workspaces/opensafely-example/learning-ehrql.
This will have you ready to run commands for the ehrQL tutorial.
The screenshot below shows this.

You are now ready to work through the ehrQL tutorial. You can skip the installation steps of the ehrQL prerequisites in the tutorial and jump straight to the section on extracting the dummy data for the tutorial.
Info
We suggest that you continue reading the rest of this page for information, then work through the ehrQL tutorial.
Other features for development🔗
ehrQL code autocompletion and reference information🔗
There is support for autocompletion of ehrQL that provides the language reference information in the Visual Studio Code editor.
The screenshot below shows this.
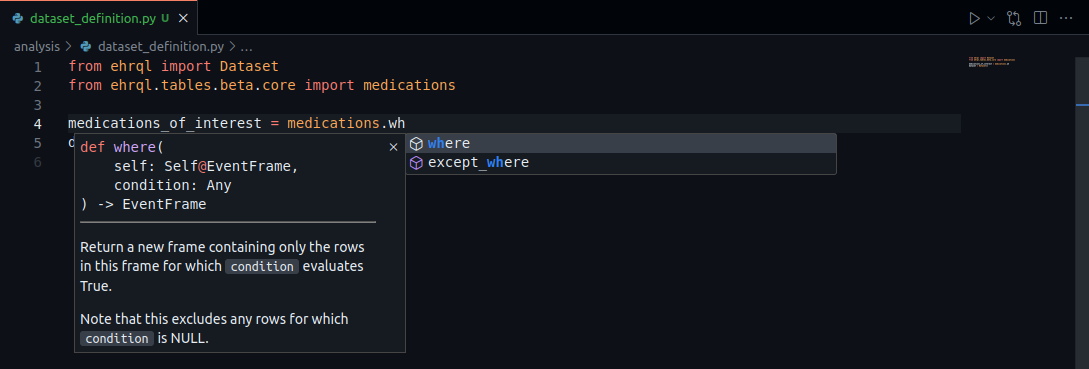
Warning
This is still being tested.
This still shows parts of ehrQL that do not form part of the public interface.
These mostly have a double underscore __ prefix.
Running Jupyterlab🔗
- In the Visual Studio Code terminal,
type
opensafely jupyterand then press Enter to launch the Jupyterlab server. - This may be useful to develop Python-based analyses interactively based on dummy data outputs.
- Your web browser should open a new tab or window or prompt you if you want to open a new tab or window. This new tab or window allows you to use the Jupyterlab server.
- If this tab or window does not display,
you can navigate to the Ports tab in the terminal,
which will show the web address to the running server.
The "Running Process" entry should start
/usr/bin/docker-proxy…Click on that link to access the Jupyterlab server. The screenshot below shows this.
- You can edit files in your codespace from within Jupyterlab.
Warning
Unlike the Visual Studio Code interface, files do not save automatically in Jupyterlab. You must save them manually.
Warning
You will still need to use Visual Studio Code to publish those changes made in your codespace, to your code repository as detailed above.
Running command-line Python🔗
- In the Visual Studio Code terminal,
type
opensafely exec pythonand then press Enter to start command-line Python.
Running command-line R🔗
- In the Visual Studio Code terminal,
type
opensafely exec rand then press Enter to start command-line R.
Info
We may look into providing a better experience for developing R code in future.
Running command-line Stata🔗
Info
This has not yet been tested, but could be added in future.
Other built-in operating system tools🔗
The current Codespaces configuration is based on Linux.
Common command-line tools that you might expect from a Linux installation,
such as cat, grep and more are available to use in the Visual Studio Code terminal.
Info
You do not need to know how to work with Linux to be able to use OpenSAFELY in Codespaces.
Use of GitHub Codespaces computer resources🔗
The default codespace has 2 computer processor cores (CPU cores) and 4 GB memory (RAM). In some cases, you may find that OpenSAFELY projects exceed the available RAM.
GitHub Codespaces does have virtual machines with more CPU cores and RAM, but these will use your free quota more quickly.
It is possible to configure what virtual machine type the codespace has when launching the codespace. See GitHub's explanation of configuring advanced options for a codespace.
It is also possible to change a virtual machine type for an existing codespace.
GitHub Codespaces billing🔗
GitHub gives all users a free and decent-sized monthly quota for Codespaces. This is accessible without a paid account. See GitHub's pricing details.
Note
You will not get billed for using Codespaces, unless you both:
- set a Codespaces spending limit
- and add a payment method
Without billing configured, you will not get invoiced or charged.
If you run out of free quota, GitHub can only block you from using Codespaces until the next monthly cycle starts.
Managing codespaces🔗
If you close a codespace in your browser, it still continues running. You can return to an open codespace from the code repository by clicking the "Code" button. The screenshot below shows this.
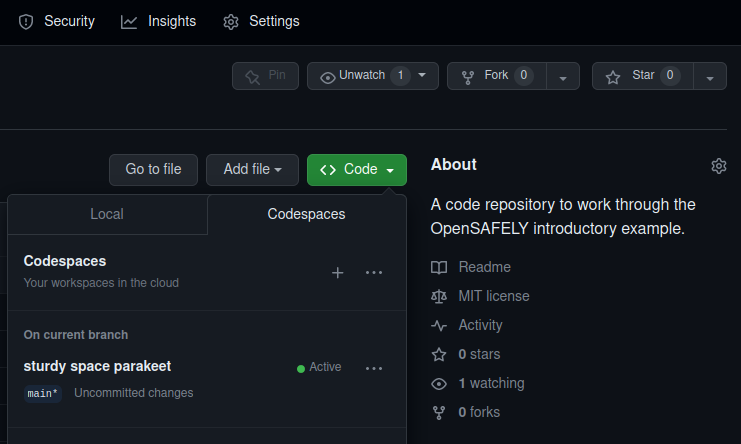
It is useful to stop or delete codespaces to prevent them from using your quota unnecessarily. There are options in this panel to do so. The screenshot below shows this.
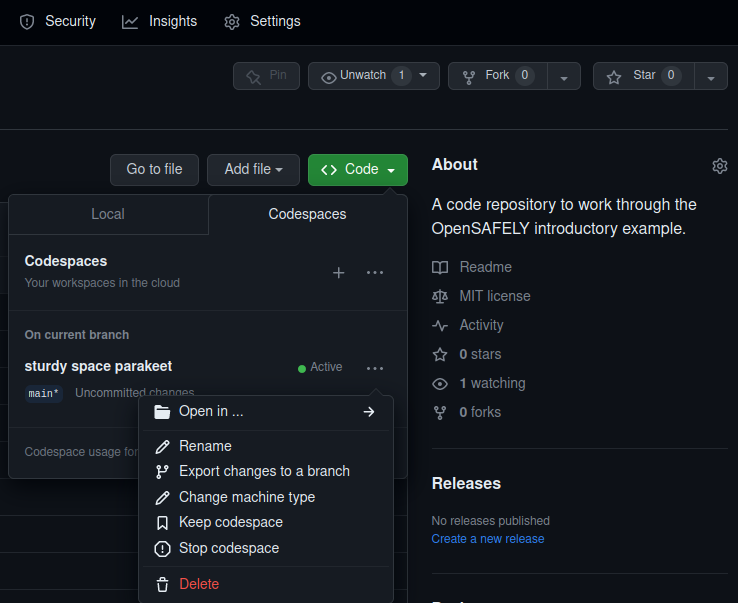
Stopping a codespace🔗
See GitHub's documentation for how to stop a codespace.
This stops a codespace running, but allows you to restart it.
Stopped codespaces still incur storage usage, but not CPU usage.
Deleting a codespace🔗
See GitHub's documentation for how to delete a codespace.
Unlike stopping a codespace, this removes the codespace entirely,
Info
If you have changes in the codespaces that have not been published to the repository, GitHub will warn you to confirm that you are sure you want to delete the codespace.
The "Export changes to a branch" option allows you to save the changes without having to go back into the codespace.
Once deleted, the codespace will not incur any usage.
Idle timeout🔗
A codespace will eventually stop when it is not being used.. This is a useful feature to prevent you from wasting free or paid Codespaces credit. This setting can be configured to give a longer or shorter duration. See the GitHub documentation.
Visual Studio Code telemetry settings🔗
This does not seem to be easily disabled by the Codespaces configuration. However, you can disable this manually through Visual Studio Code's settings, and should only need to do this once for it to apply to all codespaces you create.
See GitHub's information on Visual Studio Code's telemetry for more details.
Feedback🔗
We are still investigating how we can make Codespaces more useful for researchers working on OpenSAFELY projects.
Please feel free to ask us questions, tell us about problems you find, or give us any other feedback on the use of Codespaces with OpenSAFELY or this documentation.
Ways to contact us are listed on our "How to get help" page.